
Every hardcore camper in 99 Nights in the Forest knows that a sloppy base is a dead base. Your tents, defensive log walls, and life-saving traps can't just sit wherever you first plopped them down—that's a total newbie move. The true game-changer for any base glow-up is the Hammer, the ultimate relocation tool that turns a chaotic mess into a fortress of order. But here's the kicker: this isn't your typical crafting mallet. It doesn't build; it only moves. And getting your hands on one ASAP is the secret sauce to surviving those 99 nights without raging. Let's deep-dive into every method to snag this essential tool, with zero fluff and maximum efficiency.
🧰 What's the Deal With the Hammer? More Than a Paperweight
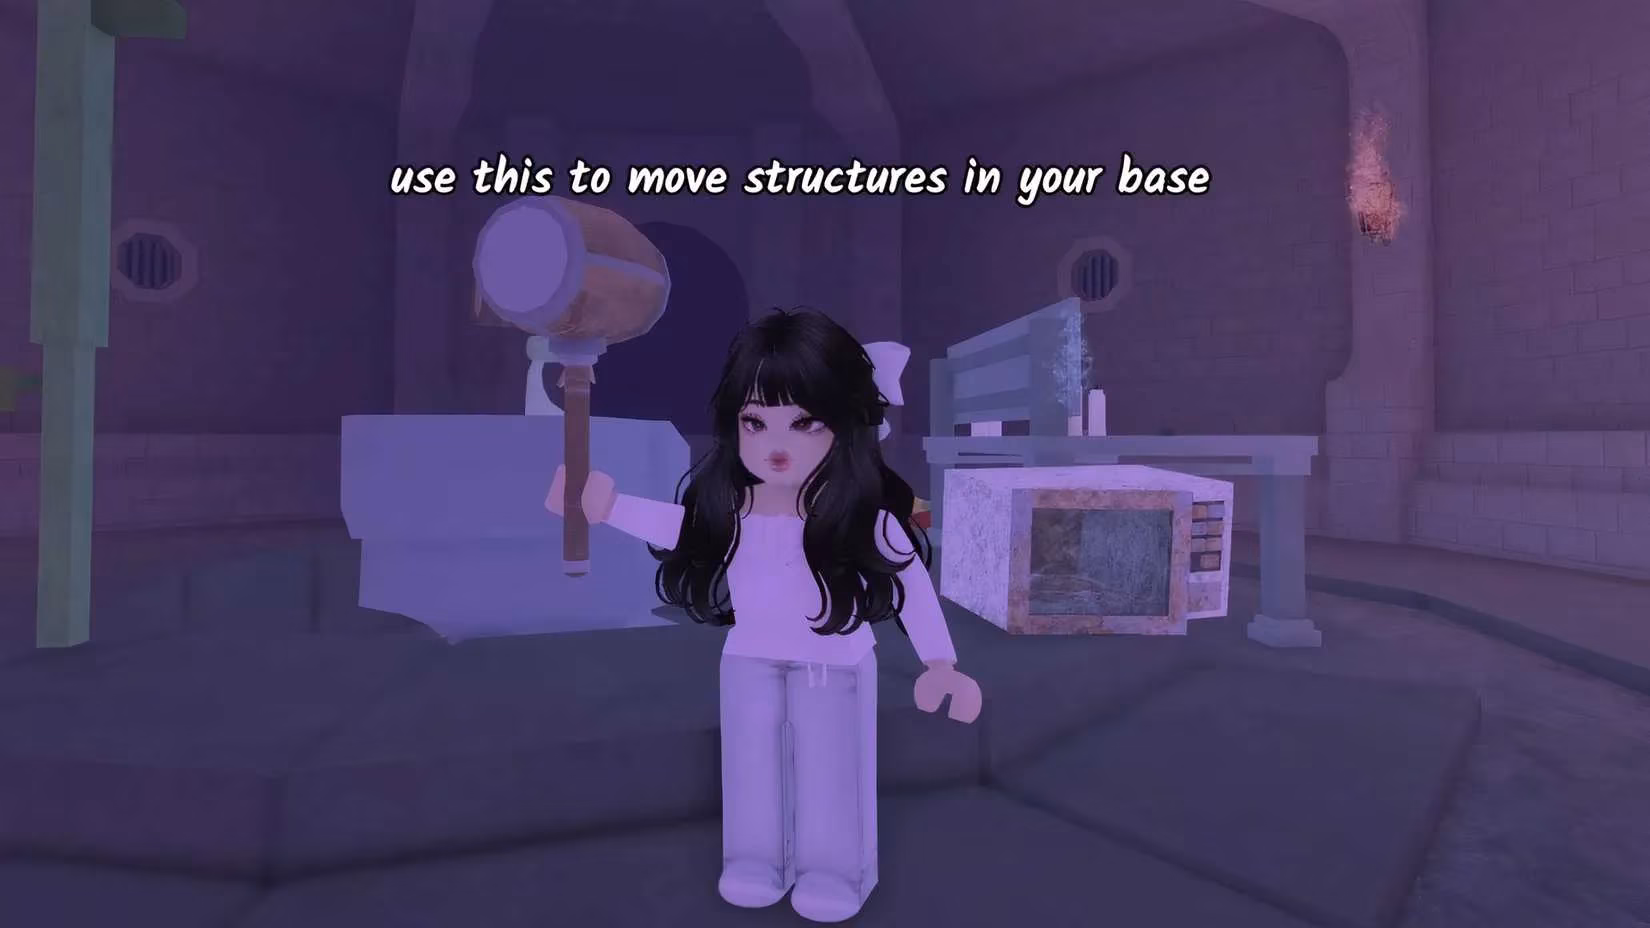
At first glance, the Hammer looks like something you'd use to nail planks together, but in this Roblox survival hit, its sole purpose is item relocation. Once you craft a cozy sleeping bag, set up a cooking station, or place a spike trap, the game normally locks those objects in place. The Hammer breaks those rules. It lets you pick up and reposition almost any deployable with a simple click—perfect for rearranging your tent layout, closing gaps in your log perimeter, or moving a trap that an enemy keeps side-stepping. Without it, your base's design is set in stone (literally), and that can mean the difference between a breezy night and a monster mosh pit at 3 AM.
Most seasoned survivors agree: the Hammer isn't a luxury, it's a mindset. It's the difference between a speedrunner's hasty camp and a true survival artist's masterpiece.
🛠️ Two Routes to Hammer Town: Pay to Play or DIY
There are exactly two ways to get a Hammer in 99 Nights in the Forest, and they cater to vastly different playstyles:
| Method | Effort Required | Cost | Best For |
|---|---|---|---|
| Pick Blacksmith or Decorator class | Zero crafting | 300/40 Diamonds | Players who hate grinding, Diamond buyers |
| Craft at the Tool Workshop | Moderate exploration + 5 Logs, 5 Scrap | Free | F2P legends, resource hoarders |
Choosing the Blacksmith or Decorator class spawns you with a free Hammer right from the get-go. Sounds like a no-brainer, right? Well, there's a catch—both classes are gated behind Diamonds, the premium currency. Blacksmith sets you back a hefty 300 Diamonds, while Decorator is a more wallet-friendly 40. If you've been hoarding Diamonds from daily logins or battle pass rewards, this is a solid early-game power spike. But if you're a free-to-play purist who'd rather grind than swipe, the crafting route is calling your name.
For those who love the true survivalist experience, forging your own Hammer is not only satisfying but also totally material-efficient. You won't bleed Diamonds, and you'll gain a deep understanding of the forest's layout. Let's break down the DIY method step by step—because missing any detail can leave you hammer-less and salty.
🪓 The DIY Hammer Quest: From Zero to Relocator
Step 1: Locate the Hidden Tool Workshop
When you first spawn into the forest, the map won't show any workshop marker. You'll need to trek toward the bottom-right region of the map. Keep an eye out for a large, somber structure with an entrance literally barricaded by tree sticks. Above the blocked door, you'll spot the universal symbol of crafting glory—an anvil emblem. That's your cue. Equip your trusty axe and start swinging to clear the wooden barrier. It's a bit like opening a secret treasure chamber, only louder and with more splinters.
Step 2: Reassemble the Anvil Blueprint
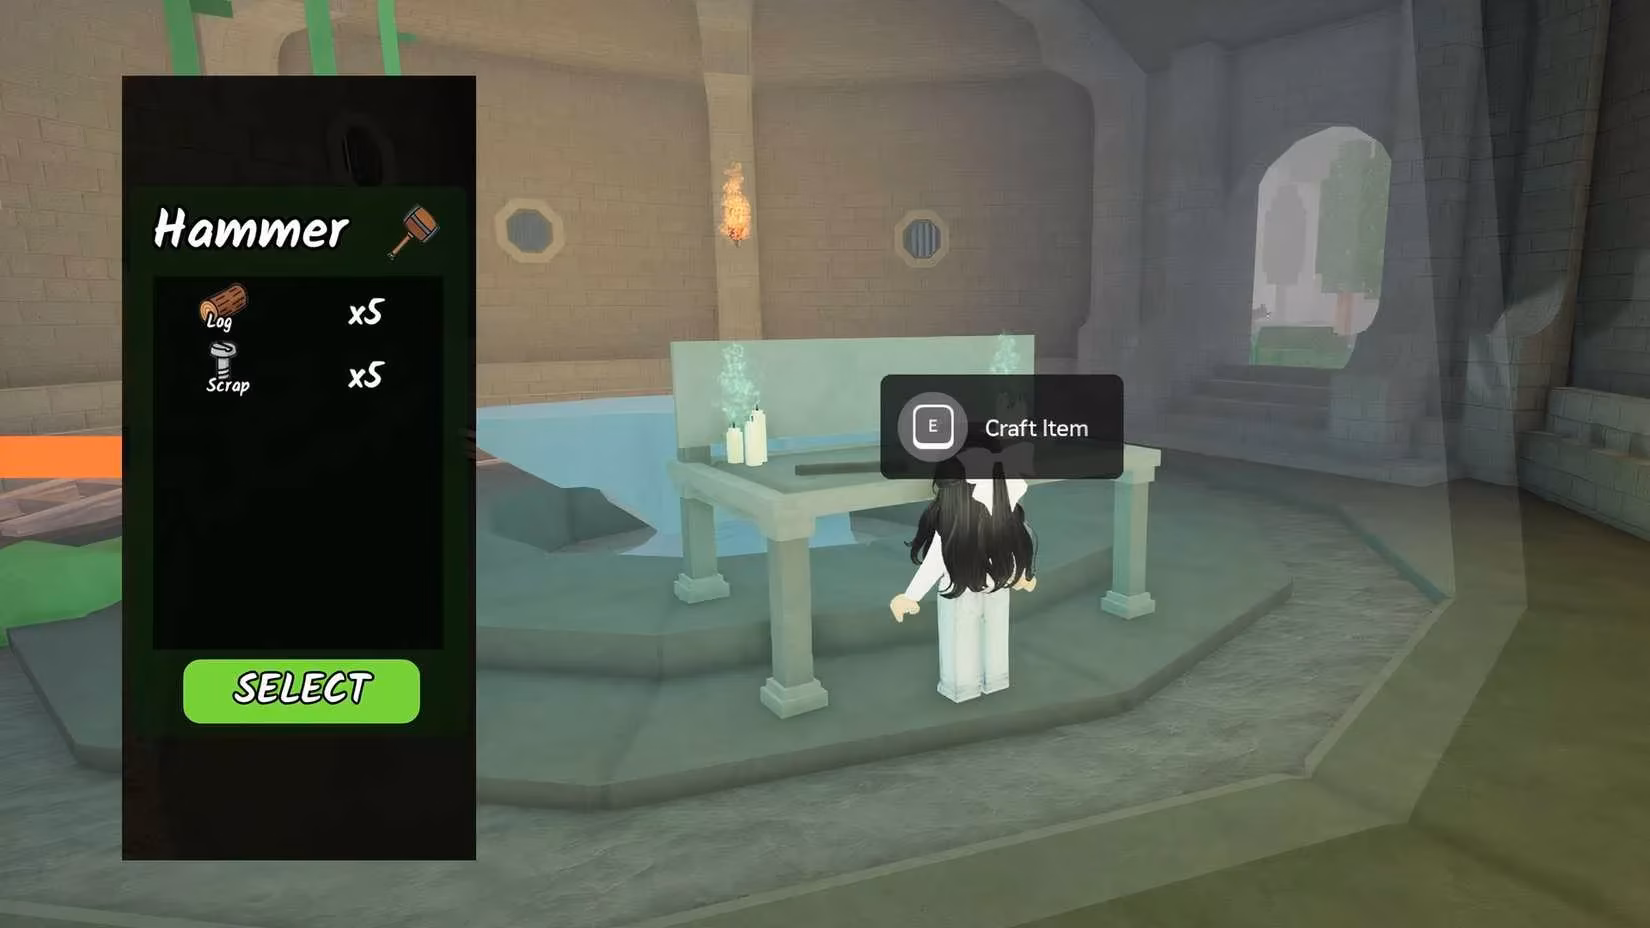
Inside, the place looks abandoned, but the items you need are scattered nearby. Search the floor and corners for three anvil pieces: the base, the front, and the back. They are usually within a few steps of the central blueprint. Grab each one and attach it to the glowing blue outline at the center. This reassembles the workshop's crafting anvil—the heart of your operation.
Step 3: Offer Your Resources and Claim Glory
Head to the crafting table on the side and scroll to the Hammer recipe. It's a simple trade: 5 Logs + 5 Scrap. Lay those materials on the anvil, wait a brief building animation, and voilà! A shiny new Hammer drops into your inventory. No complex RNG, no boss fights—just good old-fashioned looting and assembling. If you're well-prepared with an axe and a scrounging sack, you can knock out the entire process in under two minutes.
🔥 Pro tip: Gather logs from the abundant trees around the workshop while you're clearing the entrance. Scrap can be found by smashing old barrels or looting random debris. Efficiency is the name of the game.
🧹 Mastering the Art of Relocation: How to Use the Hammer Like a Pro
Now for the fun part: actually moving stuff. The Hammer doesn't consume charges, doesn't degrade, and sticks with you until the round ends (or until you die and lose your stuff, so guard it well). To use it:
-
Equip the Hammer from your backpack slot (the hotbar at the bottom).
-
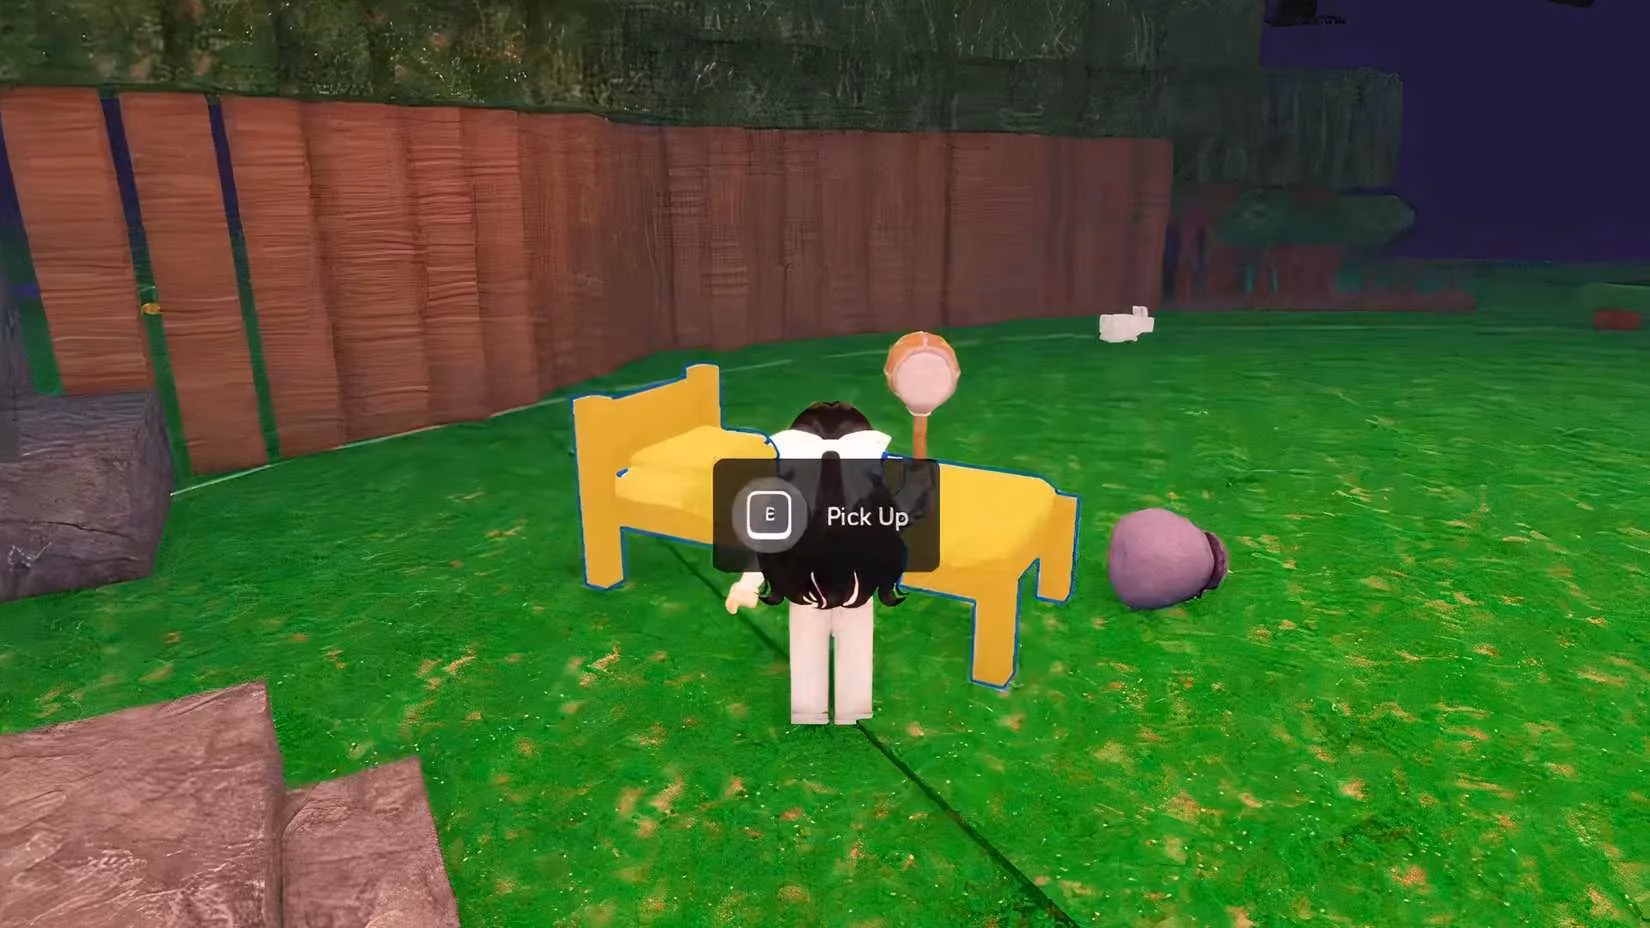
Click on any placed object you want to reposition—be it a log wall segment, a tent, a bed, or even a trap.
-
The item instantly pops into your "held" state, ready to be placed anywhere within reach.
-
Move your cursor to the desired spot and click again to set it down with surgical precision.
That's it. No cooldowns, no durability. You can rearrange your entire compound in seconds. Imagine setting up a decoy wall to mislead incoming mobs, or perfectly aligning your cooking fire so the smoke doesn't give away your position (okay, the game might not have smoke mechanics, but you get the vibe). The point is: the Hammer gives you unprecedented creative control over your survival strategy.
A common mistake players make is not pre-planning their base layout before starting to move things. With the Hammer in hand, you can fine-tune your defenses to create chokepoints and funnel enemies into kill zones. It's like playing real-time strategy within a survival sandbox.
💎 Class vs. Craft: Which Path Should You Choose in 2026?
Since the meta has evolved a bit by 2026, let's weigh the current state:
-
Diamond economy: With frequent events and battle pass seasons, free Diamonds are more plentiful than ever. If you've been stacking them, 40 Diamonds for Decorator is the best bang for your buck. You get the Hammer immediately plus the class's other perks (like furniture placement bonuses). Blacksmith at 300 Diamonds is overkill unless you also want its unique crafting speed boost.
-
New player advice: If you're fresh off the boat, don't burn your starting Diamonds. Grind the Tool Workshop once, and you'll never lack the Hammer again. The exploration also teaches you map awareness, which is more valuable than any shortcut.
-
Speedrun strats: Top-tier speedrunners often pick Decorator to skip the workshop hassle and relocate their bed right next to a resource hotspot within the first 30 seconds. Time is loot, after all.
🗺️ The Bigger Picture: Why the Hammer Defines Your Run
Beyond the obvious utility, the Hammer influences the entire rhythm of 99 Nights in the Forest. It allows you to adapt after the forest's nocturnal threats evolve. Maybe you misjudged where the mutant bears spawn; with a quick hammer session, you can shift your defensive line before nightfall. It also encourages experimentation—try building a maze of log traps and relocate them on the fly when you discover a better pattern.
Moreover, the community has embraced the Hammer as a symbol of a well-organized survivor. Streamers love showcasing meticulous base tours made possible by endless repositioning. In a game where one misplaced wall can end your run, having the power to iteratively refine your fortress is priceless.
Bottom line: Whether you buy it with Diamonds or forge it with your own two hands, get that Hammer early. Your future self (and your base) will thank you.
🔨 TL;DR Quick-Grab Cheatsheet
-
Hammer = move stuff, not build stuff.
-
Class route: Blacksmith (300 💎) or Decorator (40 💎) gives you a free one instantly.
-
Craft route: find the bottom-right Tool Workshop → break wood barrier → collect 3 anvil pieces → spend 5 Logs + 5 Scrap on the anvil.
-
Usage: equip → click on placed object → place where you want. Unlimited uses.
-
Pro move: always keep the Hammer in a safe backpack slot; lose it on death and you'll have to re-craft or run back.
Now go forth, survivor, and hammer your way to a perfectly symmetrical base that would make an interior designer weep. GG, and may your nights be ever 99.
Comments